Brain Cupcakes
If you haven’t checked out my blog’s shiny new Facebook page, go have a look!
Some of you who read my blog know that I work for a lab at the U of O that studies brains. It’s so much fun- I’ve even gotten to hold a brain before (don’t worry, just a sheep brain)! The other day, I came across this incredible blog post about a “mad scientist” birthday party, and they had frosting brains! I couldn’t believe I hadn’t thought about doing this before.
A coworker had a birthday this week, so I saw it as the perfect opportunity to whip up a batch of brain cupcakes. I’m not posting the recipe on here because I totally cheated and used boxed cake mix. BUT. I will share my recipe for stiff buttercream frosting. It needs to be stiff so that it will hold it’s brainy design on the cupcakes.
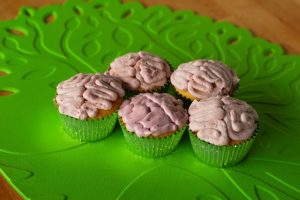
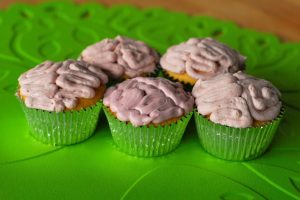
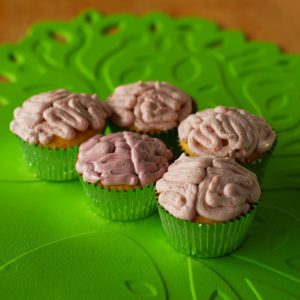
Even if you don’t work for a brain lab, I highly recommend making these, because they’re very fun. And if you serve them at a party, afterward you can tell people that your guests wanted to “eat your braaaains!” Zombie reference. You can’t tell because of my super cool, lime green tree placemat, but I used silver cupcake liners so that they wouldn’t contrast with the pink brains.
I took many different approaches to doodling brains. Here are my recommendations after much trouble shooting:
- Use a medium-smallish, plain tip
- Don’t over whip your frosting, or it makes your brains look weird
- A coil approach as opposed to zigzags makes for more “real” looking brains
- Making two clear hemispheres is also crucial to a realistic looking brain
Have fun!
Stiff Buttercream Frosting
(for brain cupcakes)
Ingredients
1/2 cup softened butter
1 1/2 cups powdered sugar
1 tsp vanilla
1-3 tablespoons milk
2 drops red food coloring
1 drop green food coloring
1 drop blue food coloring
Directions
1. Whip the butter until fluffy using the whisk attachment on your KitchenAid (or with a whisk). Add the vanilla and combine. Add 1 tablespoon of milk and combine.
2. Add the powdered sugar 1/4 cup at a time, until frosting is well combined and stiff. You may need a little more or a little less than 1 1/2 cups. If the texture is off or it’s too thick, not stiff, add more milk, a little at a time.
3. When desired consistency is achieved, add the food coloring and mix until one even pinkish grayish color.